

Have you ever picked up a skein of variegated yarn, loving the colors, only to find they pool in unexpected ways when you start knitting or crocheting? It can be a little frustrating, right? But what if I told you that this 'pooling' isn't always random? Sometimes, it's something you can actually control to make really cool patterns. This guide is all about understanding yarn pooling, figuring out why it happens, and learning how to make it work for you. We'll cover everything from the basics to some neat tricks to get the designs you want.
Key Takeaways
- Yarn pooling happens when colors in a multicolored yarn line up to make a design.
- Things like yarn size, how long each color section is, and your stitch count all change how yarn pools.
- You can adjust your stitches and how tight you work to control the pooling effect.
- Yarn pooling works in different crafts, like knitting, crochet, and weaving.
- Trying things out and practicing a lot will help you get good at yarn pooling.
Understanding Yarn Pooling
What Does Pooling Mean in Yarn?
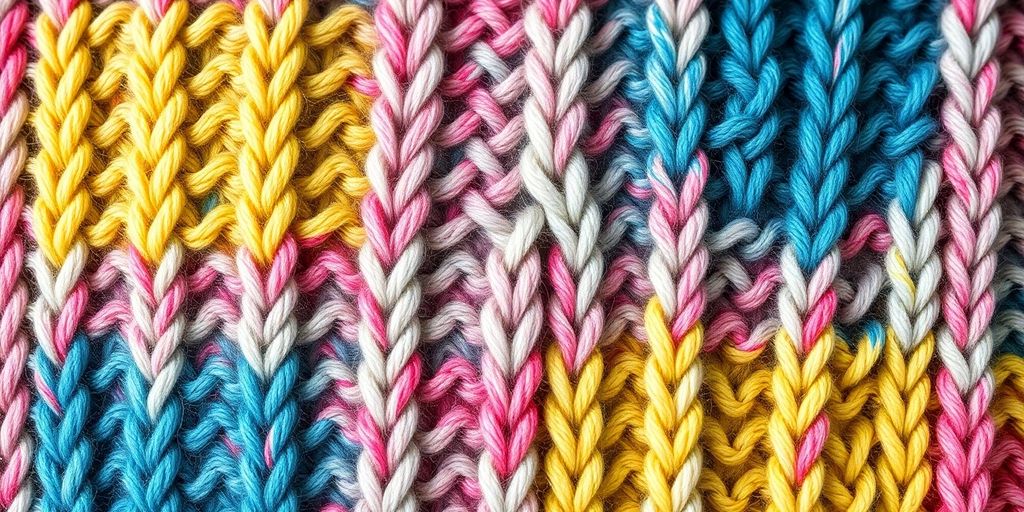
Okay, so what is yarn pooling? Basically, it's what happens when the colors in a variegated yarn decide to clump together in a predictable way as you knit or crochet. Instead of a random mix of colors, you get distinct blocks or lines of color. It's like the yarn is trying to make a pattern all by itself! This can be super cool if you're going for a specific look, but it can also be a bit annoying if you're not expecting it. You can use variegated yarn to create colorful patterns.
Types of Pooling
There are a few different ways that yarn can pool, and knowing the types can help you plan your projects:
- Planned Pooling: This is when you intentionally manipulate your stitches to make the colors pool in a specific pattern. It takes some practice, but you can get really cool results.
- Random Pooling: This happens when the colors pool without any real planning on your part. It can be a happy accident, or it can be something you want to avoid.
- Stripe Pooling: This is when the colors line up to create stripes, either vertically or horizontally. It's a pretty common type of pooling, especially with yarns that have long color repeats.
Understanding the type of pooling you're dealing with is half the battle. Once you know what's happening, you can start to control it (or at least work with it!).
Common Misconceptions About Pooling
Let's clear up some common myths about yarn pooling:
- Pooling is always ugly: Nope! It's all about personal preference. Some people love the look of pooled yarn, and others hate it. It really depends on the project and the yarn.
- You can't control pooling: False! While random pooling can happen, there are definitely ways to influence how your yarn pools. Adjusting your tension, stitch count, and even the type of stitch you use can all make a difference.
- All variegated yarn will pool: Not necessarily. The length of the color repeats and the way the colors are dyed will affect whether or not a yarn is likely to pool. Some yarns are designed to pool, while others are not.
Factors Influencing Yarn Pooling
Yarn pooling is super interesting, and it's all about how the colors in your yarn decide to hang out together in your project. It's not just magic; several things affect it. Knowing these things can really help you get the look you're going for.
Yarn Weight and Texture
Yarn weight and texture are big players. Heavier yarns tend to make bigger, more obvious color chunks. Think of it like using a thick marker versus a fine-tipped pen – the thick marker is going to make bolder lines. Lighter yarns? They give you more subtle color changes. And the texture, like if it's smooth or fuzzy, can change how the colors blend. Fuzzy yarns might blur the lines a bit more.
Color Lengths and Repeats
How long each color section is and how often it repeats is also key. If you've got long stretches of each color, you'll probably get more predictable pooling, maybe even a gradient effect. But if the colors change super fast, you might end up with a more random, scattered look. It's a good idea to test with swatches to see what a yarn does before you commit to a whole project.
Stitch Count and Tension
Stitch count and tension are super important. The number of stitches you make in each row can line up with the color changes in the yarn, which makes the pooling effect stronger. Also, how tight or loose you hold the yarn can change the stitch length and mess with how the colors pool. You want to keep your tension steady so the pooling looks even throughout your project.
It's like this: imagine you're painting stripes on a wall. If your stripes are always the same width, they'll line up nicely. But if you start making some stripes wider or narrower, the pattern gets all wonky. Same thing with yarn pooling – consistency is key!
Techniques for Achieving Desired Pooling Effects
Planned Pooling Versus Random Pooling
Okay, so there are basically two ways you can go about this whole yarn pooling thing. You can either try to control it (planned pooling) or just let it do its thing (random pooling). Planned pooling is when you're trying to make a specific pattern happen, like argyle or stripes. It takes some work, but it can be really cool. Random pooling is more like, 'Hey, let's see what happens!' It's less predictable, but sometimes you get awesome surprises.
Adjusting Gauge and Tension
Gauge and tension are super important. Think of it like this: if your stitches are too tight or too loose, the colors won't line up the way you want them to. Adjusting your gauge means changing the number of stitches and rows per inch. You can play around with needle or hook sizes to get it right. Tension is how tight you hold the yarn. A looser grip will make bigger stitches, and a tighter grip will make smaller ones. Both affect how the colors align.
Here's a simple example of how tension can affect pooling:
| Tension | Stitch Size | Color Alignment |
|---|---|---|
| Tight | Smaller | More Compact |
| Loose | Larger | More Spread Out |
Choosing the Right Stitches
Believe it or not, the stitch you pick can make a big difference. Some stitches show off pooling better than others. Simple stitches, like single crochet or knit stitch, tend to work well because they don't break up the color repeats too much. More complicated stitches, like cables or bobbles, can hide the pooling effect. So, if you're going for a specific look, experiment with different stitches to see what works best.
It's all about playing around and seeing what happens. Don't be afraid to rip things out and try again. That's how you learn what works for you and your yarn. Plus, it's kind of fun to see how different techniques change the way the colors pool. It's like a little yarn magic trick!
Yarn Pooling in Different Crafts
Yarn pooling isn't just for one type of craft! It's super versatile and can be used in knitting, crochet, and even weaving to create some really cool effects. Each craft has its own little quirks when it comes to how the colors play out, so let's take a look.
Pooling in Knitting
Knitting and yarn pooling go together like peanut butter and jelly. By carefully working with variegated yarn, knitters can make all sorts of interesting patterns, like stripes, zigzags, or even argyle. The trick is to keep your stitch count and tension consistent throughout the whole project. I've seen some amazing socks, scarves, and blankets made this way. It's all about controlling how the colors line up as you knit.
Pooling in Crochet
Crochet is another great way to use yarn pooling. The stitch you pick makes a big difference in how the colors pool. For example, a moss stitch can give you a plaid-like look. Crocheters often play around with different stitches and how tight or loose they crochet to get the pattern just right. Blankets and shawls are popular projects for this, but you can even make garments. I've been wanting to try a cotton yarn project myself, maybe a colorful blanket.
Pooling in Weaving
Weaving brings a whole new level to yarn pooling. The way you arrange the warp and weft threads can create some really intricate designs. Weavers can use variegated yarns to make things like checkerboards or zigzags. It takes some planning and knowing how the yarn colors will interact, but the results can be stunning. I've seen some wall hangings that look like modern art, all thanks to clever yarn pooling in weaving.
Pooling in different yarn crafts opens up a world of creative possibilities. Whether you're into knitting, crochet, or weaving, learning the right techniques can turn a simple variegated yarn into something truly special.
Tips and Tricks for Successful Yarn Pooling
Yarn pooling can seem tricky at first, but with a few helpful tips, you can really get the hang of it and start creating some awesome projects. It's all about understanding your yarn and being willing to experiment a little. Don't be afraid to rip things out and try again – that's part of the process!
Selecting the Right Yarn
Choosing the right yarn is super important for successful pooling. You'll want to look for yarns that have fairly consistent color repeats. If the color changes are all over the place, it's going to be much harder to predict and control the pooling. Also, make sure all your skeins are from the same dye lot. Trust me, this will save you a headache later on. Different dye lots can have slight color variations, which can mess up your planned pooling effect.
Testing with Swatches
Before you jump into a big project, always, always, always make a swatch! This is your chance to see how the colors are going to pool and to make any necessary adjustments. A 4x4 inch swatch is usually good enough. Keep track of your stitch count and row count so you can replicate it later. If you don't like the way the colors are pooling, you can try a different stitch, a different needle size, or even a different yarn altogether. It's much easier to experiment on a small swatch than on an entire blanket!
Troubleshooting Common Issues
Sometimes, even with the best planning, things don't go quite as expected. Maybe the colors aren't pooling the way you want, or maybe you're getting weird gaps or stripes. Don't panic! Here are a few things you can try:
- Adjust your tension: A tighter tension will make the colors pool more closely together, while a looser tension will spread them out.
- Change your stitch count: Adding or subtracting a few stitches can shift the color repeats and change the pooling effect.
- Try a different stitch: Some stitches are better suited for pooling than others. Single crochet and garter stitch are often good choices for beginners.
Remember, yarn pooling is part art, part science, and part luck. Don't be afraid to experiment and have fun with it. The more you practice, the better you'll get at predicting and controlling the pooling effect. And even if things don't go exactly as planned, you might end up with something even more beautiful and unique!
Advanced Yarn Pooling Patterns and Projects
Argyle and Plaid Patterns
Okay, so you've got the basics down. Now it's time to get fancy! Argyle and plaid are totally achievable with yarn pooling, but they require some serious planning. The key is understanding your yarn's color repeats and how they interact with your stitch pattern. It's like a math problem, but way more colorful. You'll probably need to swatch a LOT to get it right, but the results are so worth it. Think cozy argyle socks or a super cool plaid blanket.
Checkerboard and Stripes
Checkerboard and stripes might seem simple, but with yarn pooling, you can add a really unique twist. Instead of using different solid colors, the variegated yarn creates a textured, almost watercolor effect within each square or stripe. It's all about controlling the pooling to create defined blocks of color. Here's a few things to keep in mind:
- Use a stitch that shows off the color changes, like moss stitch or linen stitch.
- Pay attention to your tension. Consistent tension is key for even blocks.
- Don't be afraid to experiment with different yarn weights for different effects.
I tried a checkerboard pattern with a self-striping yarn once, and it looked like a hot mess at first. The colors were all over the place! But after a few rows, I realized that the randomness was actually part of the charm. It gave it this cool, organic look that I never could have planned.
Creating Unique Visual Effects
Ready to really blow some minds? Yarn pooling can be used to create all sorts of crazy visual effects. Think optical illusions, gradients, and even abstract art. It's all about playing with the yarn's color changes and your stitch patterns to trick the eye. You can learn assigned pooling techniques in a class to master these effects. Here are some ideas to get you started:
- Planned Color Placement: Intentionally shifting the yarn to create specific shapes or images.
- Textured Stitches: Using stitches like bobbles or cables to disrupt the pooling and add dimension.
- Combining Yarns: Mixing different variegated yarns to create complex color palettes.
Here's an example of how gauge can affect the pooling effect:
| Gauge (stitches per inch) | Color Pooling Effect |
|---|---|
| 4 | Broad, blended color blocks |
| 6 | More defined color repeats, tighter pooling |
| 8 | Very distinct color changes, almost striped effect |
Conclusion
So, figuring out how yarn pooling works can really open up a bunch of cool ideas for your knitting and crochet stuff. When you get a handle on how to control those color patterns in variegated yarn, you can make some truly awesome designs that give your projects a special touch. Just remember, things like the yarn you pick, how many stitches you use, your tension, and the pattern itself all play a part in how the pooling turns out. With a little practice and not giving up, you can try out different ways to get the look you want. So, don't be scared to just jump in, try new things, and most importantly, have a blast with your yarn projects!
Frequently Asked Questions
What exactly is yarn pooling?
Yarn pooling is a cool trick used in knitting and crocheting. It's when the different colors in a single skein of yarn line up in a special way to make a pattern. You don't need to buy lots of different colored yarns; one special yarn does the job!
How does yarn thickness affect pooling?
The thickness of your yarn changes how pooling looks. Thicker yarns usually make bigger, more obvious color patches, while thinner yarns create smaller, more subtle designs. It's all about finding the right balance for the pattern you want.
What's the difference between planned and random pooling?
There are two main types: 'planned pooling' and 'random pooling.' Planned pooling is when you carefully work your stitches to make a specific design, like argyle. Random pooling just happens on its own, creating unique, unexpected color splashes.
Why isn't my yarn pooling like the example?
If your pooling doesn't look like the picture, it could be due to a few things. Yarn thickness, how long each color section is, your stitch count, or even how tightly you knit or crochet can all change the outcome. It's a good idea to make a small test piece first to see how your yarn will behave and adjust as needed.
Can I do yarn pooling in both knitting and crochet?
Yes, absolutely! You can do pooling in both knitting and crocheting. The way you do it might be a bit different for each craft, and the patterns you get can vary, but the basic idea is the same.
How can I fix a pooling mistake?
Fixing a pooling mistake often means changing your tension or stitch count. Sometimes, just switching to a different size hook or needle can make a big difference. Don't be afraid to try different things until you get the look you want!