
So, you've got this beautiful yarn in a hank, all twisted up, and you're probably wondering how to turn it into a neat ball without ending up with a giant, tangled mess. Trust me, it happens to the best of us. But don't worry! Winding yarn by hand is a skill you can totally pick up, and it doesn't need any fancy tools. This guide will walk you through how to wind a yarn hank into a perfect, center-pull ball, helping you avoid those frustrating knots and twists.
Key Takeaways
- Always prepare your yarn hank first by untwisting it and finding the ties.
- Use something to hold the yarn open, like chair backs or a helper, to keep it from tangling.
- Start your yarn ball by making a small core and winding in a figure-eight pattern.
- Keep your winding even and don't pull too tight to make a good, usable ball.
- Winding yarn into a center-pull ball makes it easier to use and store.
Preparing Your Yarn Hank for Winding
Before you can even think about knitting or crocheting, you've got to get that yarn ready! If you're dealing with a hank, that means winding it into a ball. But trust me, a little prep work goes a long way in preventing a tangled disaster. I've been there, wrestling with yarn that looks like a bird's nest, and it's not fun. So, let's get this hank tamed before we even start.
Untwisting the Yarn Hank
Okay, first things first: untwist that hank! It might seem obvious, but it's a crucial step. Don't just start pulling at random strands. Gently find where the yarn is joined in a loop. It's usually twisted together to form a sort of infinity shape. Separate the bottom portion of the yarn hank to start. You'll want to transform that figure eight into a big, open oval. This makes it easier to access the yarn without creating a knotty mess. Trust me, patience here pays off big time.
Locating the Securing Knots
Next up, find those pesky securing knots. Yarn hanks are usually tied in a few places to keep them from unraveling during shipping and storage. These knots are your enemy if you try to wind the yarn without removing them. Carefully inspect the hank and locate all the knots. They're usually pretty obvious, but sometimes they can be sneaky. Once you find them, gently untie them. If they're too tight to untie, carefully snip them with scissors, being super careful not to cut the actual yarn. I've done that before, and it's not a happy moment. Get rid of the little bits of string after you're done.
Laying the Hank Straight
Now that the hank is untwisted and the knots are gone, it's time to lay it out straight. This might seem like a small thing, but it really helps prevent tangles as you wind. Find a clean, flat surface, like a table or even the floor. Gently spread the yarn out so that it forms a large loop. Make sure there aren't any major kinks or twists in the yarn. You want it to be as smooth and even as possible. Some people like to drape the loop over a chair back or two. This keeps the yarn off the floor and makes it easier to access as you wind. Experiment and see what works best for you.
I remember the first time I tried to wind a hank of yarn. I skipped all these prep steps and just started pulling. Big mistake! I ended up with a tangled mess that took me hours to untangle. Now, I always take the time to prepare the hank properly, and it makes the whole winding process so much smoother and less frustrating.
Setting Up for Effortless Winding

Okay, so you've got your hank, and you've (hopefully) untangled it without too much drama. Now, let's get ready to actually wind this thing into a usable ball. Proper setup is key to avoiding frustration later. Trust me, a little prep work now saves a lot of headache later when you're halfway through and everything's a knotted mess.
Opening the Hank into an Oval Shape
First things first, you need to open up that hank. Don't just leave it in a tight loop. Gently spread it out into a more oval shape. This allows the yarn to feed more freely as you wind. Think of it like this: you're creating a runway for the yarn. The wider the runway, the smoother the takeoff (or, in this case, the winding!). This also helps you see any potential snags or knots before they become a major problem. It's much easier to deal with a small tangle at this stage than when you've already wound half the hank.
Utilizing Household Items for Support
Now, how do you keep that oval shape open and accessible while you wind? You've got options! A lot of people like to use the back of a chair. Drape the opened skein over the chair back, making sure the yarn strands are relatively flat and not twisted around each other. Another option is to use a swift, if you have one. If you don't have a fancy swift, don't worry! You can improvise. Here are a few ideas:
- Two chairs placed back-to-back
- A coat rack
- Even your knees (if you're sitting down, of course!)
The goal is to keep the yarn elevated and accessible, so it doesn't get tangled on the floor or furniture. The height of the support doesn't matter too much, as long as it's comfortable for you to reach and wind.
Enlisting a Helping Hand
If you're really struggling to keep the yarn organized, don't be afraid to ask for help! A second pair of hands can make a huge difference. Have a friend or family member hold the hank open for you while you wind. This is especially helpful if you're working with a particularly large or unruly hank. Plus, it's a great way to socialize while you're crafting! Just make sure your helper understands the importance of keeping the yarn tension consistent and avoiding sudden movements that could cause tangles. It's also a good idea to establish some ground rules beforehand, like "If you need to move, let me know first!" or "If you see a knot, point it out!"
Winding yarn can be a solitary activity, but it doesn't have to be. Enlisting a helper can not only make the process easier but also more enjoyable. It's a chance to connect with someone while you're both working towards a common goal: a perfectly wound ball of yarn.
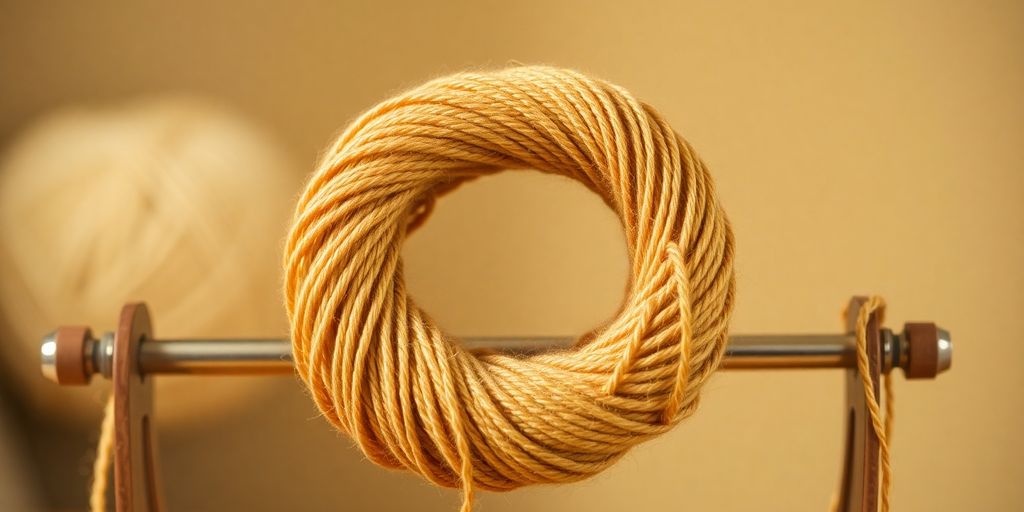
Initiating the Center-Pull Ball
Finding the Yarn End
Okay, so you've got your hank prepped and ready to go. Now comes the slightly tricky part: finding the right end to start your center-pull ball. Usually, one end is tucked in or tied loosely. Don't just yank! Gently feel around. It's like a little yarn treasure hunt. The goal is to find the end that will pull out smoothly, without causing a yarn avalanche. Sometimes, it helps to give the hank a gentle shake to loosen things up. If you accidentally pull the wrong end, don't panic. Just carefully tuck it back in and try again. Patience is key here!
Creating the Initial Yarn Core
This is where the magic begins! Hold the yarn end between your thumb and forefinger, leaving a tail of about 4-6 inches. Now, start wrapping the yarn around those fingers a few times. Think of it like you're making a tiny yarn cocoon. Don't wrap too tightly, or you'll have a hard time pulling the center later. Aim for a loose, fluffy little core. This core is the foundation of your center-pull ball, so make sure it's secure enough to hold its shape.
Forming the Figure-Eight Base
Once you have a small core, it's time to switch to a figure-eight motion. Wrap the yarn around your fingers in a figure eight, going over and under. This helps to create a stable base for the ball and prevents it from collapsing on itself later. Keep the tension even, not too tight and not too loose. After a few figure eights, gently slip the yarn off your fingers, maintaining the shape. Now you have a tiny, adorable yarn base that's ready to grow into a beautiful center-pull ball.
Starting your center-pull ball correctly is super important. A good start means fewer tangles and a smoother winding process overall. Take your time with these initial steps, and you'll be well on your way to a perfectly wound yarn ball.
Mastering the Winding Technique
Transitioning to a Circular Wrap
Once you've got that initial core and figure-eight base going, it's time to shift gears. Instead of continuing the figure-eight pattern, start wrapping the yarn around the core in a circular motion. Think of it like you're building a tiny planet, layer by layer. The goal here is to create a smooth, even surface for your center-pull ball. Don't worry too much about perfection at first; just focus on covering the base and building up the ball's form.
Maintaining Consistent Tension
Tension is key to a well-wound yarn ball. Too loose, and your ball will be floppy and prone to collapsing. Too tight, and you'll stretch the yarn, which can affect your finished project. Aim for a Goldilocks tension – not too tight, not too loose, but just right. A good way to check is to gently squeeze the ball as you wind. It should feel firm but not rock hard. If you notice the yarn is getting too tight, try loosening your grip slightly. If it's too loose, apply a bit more gentle pressure.
Ensuring a Smooth Yarn Feed
Keeping the yarn flowing smoothly is crucial for preventing tangles and knots. Make sure the yarn is unwinding freely from the hank or skein. If you're using a swift, check that it's rotating easily. If you're using a chair or your knees, make sure the yarn isn't snagging on anything.
Here are some tips for a smooth yarn feed:
- Periodically check the yarn source for snags or knots.
- Adjust the position of the yarn source as needed to minimize friction.
- Use a yarn bowl or other container to keep the yarn from rolling around.
It's easy to get frustrated when the yarn isn't cooperating, but try to stay patient. A little bit of extra care during the winding process will pay off in the long run with a beautiful, tangle-free yarn ball. Plus, it's kind of meditative once you get the hang of it!
Preventing Tangles and Twists
Addressing Yarn Twisting During Winding
Okay, so you're winding away, feeling good, and then BAM! The yarn starts twisting on itself like a confused snake. What gives? Usually, it's because you're pulling the yarn at an angle or with too much force. The key is to let the yarn flow naturally. Think of it like water – it wants to go the path of least resistance. If you're fighting it, it's going to get tangled. Try these:
- Make sure your yarn source (whether it's a swift, your knees, or a helpful friend) is positioned so the yarn comes off smoothly.
- Avoid sudden jerks or pulls. Slow and steady wins the race (and avoids the knots).
- Periodically pause and let the yarn untwist itself. Seriously, just let it hang for a sec.
Strategies for Smooth Yarn Release
How the yarn comes off the hank or ball makes a HUGE difference. If you're using a swift, make sure it's turning freely. If you're using your hands or knees (like me, sometimes!), be mindful of how the yarn is positioned. I've found that a little adjustment can save a lot of headaches. Here's what I do:
- If using a swift, check that it spins without resistance. A squeaky or stiff swift is a tangle waiting to happen.
- If using your hands, try gently rotating the hank as you wind. This helps distribute the tension and prevents build-up.
- Consider using a yarn bowl to keep the yarn from rolling around and getting caught on things. It's a game changer!
Tips for a Tangle-Free Process
Prevention is better than cure, right? So, before you even start winding, take a few minutes to set yourself up for success. A little prep work can save you from a mountain of frustration later. I've learned this the hard way, believe me.
- Make sure your work area is clear of clutter. Cats, rogue coffee cups, and rogue objects are the enemy.
- Wind in a well-lit area. It's easier to spot potential tangles before they become major problems.
- Don't try to wind too much yarn at once. Smaller hanks are easier to manage. I know it's tempting to just get it all done, but trust me on this one.
I always keep a small pair of scissors handy. Not for cutting the yarn (unless absolutely necessary!), but for snipping away any little bits of fluff or fuzz that might be causing snags. It's like a tiny yarn spa treatment. Also, patience is key. If you do encounter a tangle, don't just yank on it. Gently tease it apart. You'll thank yourself later.
Benefits of Hand-Wound Yarn Balls
Understanding Center-Pull Advantages
Hand-winding yarn into a center-pull ball offers some real perks. The biggest one is probably how neatly the yarn dispenses. No more chasing runaway balls across the floor! Plus, it helps keep your yarn clean and less likely to tangle as you work on your project. It's a simple thing that can make a big difference in your crafting experience.
Preserving Yarn Integrity
Did you know that storing yarn in a tight ball long-term can actually stretch the fibers? When you hand-wind, you can control the tension, preventing over-stretching. This is especially important for delicate or natural fibers. Plus, you get to really feel the yarn as you wind, checking for any thin spots or imperfections before you start knitting or crocheting. This can save you from discovering a flaw halfway through your project!
Convenience for Knitting and Crocheting
Having your yarn in a neat, center-pull ball just makes things easier. No more skeins collapsing on themselves or getting tangled in your bag. You can easily pop the ball into a yarn bowl or bag and start working. Plus, it's easier to estimate how much yarn you have left, which is super helpful when planning larger projects. It's all about making the crafting process smoother and more enjoyable. To prevent yarn from losing its shape, winding it into a ball is a great idea.
Hand-winding yarn isn't just about aesthetics; it's about respecting the yarn and optimizing your crafting process. It's a small investment of time that pays off in terms of yarn quality, ease of use, and overall enjoyment of your hobby.
Troubleshooting Common Winding Issues
Dealing with Snags and Knots
Okay, so you're winding away, feeling all productive, and BAM! A snag. Or worse, a knot. Don't panic! The worst thing you can do is yank on it. Seriously, resist the urge.
Here's my usual approach:
- First, stop winding immediately. Assess the situation. Where is the snag coming from? Is it in the hank itself, or is it something you've already wound?
- Gently try to loosen the yarn around the snag. Use a needle or your fingers to carefully separate the strands. Patience is key here.
- If it's a knot, try to identify what kind of knot it is. Sometimes you can work it out with your fingers. If it's too tight, consider carefully cutting the knot out, but only as a last resort. You'll have to join the yarn later, but it's better than ruining the whole ball.
I find that good lighting helps a ton when dealing with snags and knots. A bright lamp can make it easier to see what's going on and prevent you from making the problem worse.
Correcting Uneven Ball Shape
So, you're winding, and you notice your ball is starting to look... wonky. Maybe it's flat on one side, or it's bulging out in weird places. This happens! It's usually a tension issue. If you are working with faulty yarn winding, it can cause defects in the knitted fabrics.
Here's how to fix it:
- Stop winding and take a look at the ball. Identify the areas that are uneven.
- Adjust your tension. If the ball is too tight in some areas, loosen your grip. If it's too loose, tighten it up a bit. The goal is to have consistent tension throughout the ball.
- Try changing the angle at which you're winding. Sometimes, winding from a slightly different angle can help even things out.
- If the ball is really misshapen, you might need to unwind it a bit and start over. It's annoying, but it's better than ending up with a weird, unusable ball.
Managing Yarn Slippage
Slippery yarn can be a real pain to wind. It just slides all over the place, making it hard to get a good grip and maintain consistent tension. Some yarns, like silk or bamboo, are naturally more slippery than others. Here are some tips for dealing with yarn slippage:
- Use a yarn with more grip. Okay, I know that's not always an option, but if you're really struggling, consider switching to a yarn that's easier to work with. Wool or cotton blends tend to have more grip than silk or bamboo.
- Try winding the yarn more slowly. This will give you more control and prevent the yarn from slipping out of your hands.
- Use a non-slip surface. Place a rubber mat or a piece of non-slip fabric on your lap or table to prevent the yarn from sliding around. This can make a big difference, especially with super slippery yarns.
- Consider using a yarn bowl. A yarn bowl can help keep the yarn contained and prevent it from rolling away. Look for one with a good weight to it, so it doesn't slide around too much.
Wrapping It Up
So, there you have it. Winding yarn from a hank into a neat ball might seem like a big deal at first, but it's really not so bad. With a little patience and these simple steps, you can avoid all those annoying tangles. Plus, getting your yarn ready this way makes your projects so much easier to work on. No more chasing runaway balls or wrestling with knots. Just smooth, happy crafting. Give it a try next time you get a hank of yarn; you'll be glad you did.
Frequently Asked Questions
What's a yarn hank and why do I need to wind it into a ball?
A yarn hank is basically a big loop of yarn twisted up. Before you can use it for knitting or crocheting, you need to wind it into a ball. If you try to use it as is, it'll turn into a giant, tangled mess, and nobody wants that!
What can I use to hold my yarn hank while I'm winding it if I don't have special tools?
You can use a few things around your house! The back of two chairs works great. You can also drape the yarn over your knees or even have a friend hold it out like a big loop. The main idea is to keep the yarn spread out so it doesn't get tangled while you're winding.
What's a 'center-pull' ball and why is it better?
A center-pull ball means you pull the yarn from the middle of the ball instead of the outside. This is super helpful because the ball stays put and doesn't roll all over the floor while you're working. It also helps prevent tangles as you knit or crochet.
My yarn is getting twisted while I'm winding it. How can I stop this?
It's normal for yarn to get a little twisted, especially with certain types. To fix this, you can pause your winding and let the yarn hang freely. It will often untwist itself. You can also gently spin the yarn backward with your fingers to help it unwind.
How do I find the starting end of the yarn in a hank?
The best way to find the end is to untwist your hank and look for any small ties or knots that are holding the loop together. Once you snip or untie these, you should be able to find a loose end. Sometimes there are two ends, and you can pick either one to start with.
Can I really wind yarn into a ball without buying any special equipment?
Yes, you can! Winding yarn by hand is a great skill to learn and doesn't require any fancy gadgets. This guide will show you exactly how to do it using simple methods and things you already have at home.